Configure a Policy-Based VPN between Windows Azure and a Dell SonicWALL Firewall
by Hemlata Tiwari, 3rd Dec, 2014.
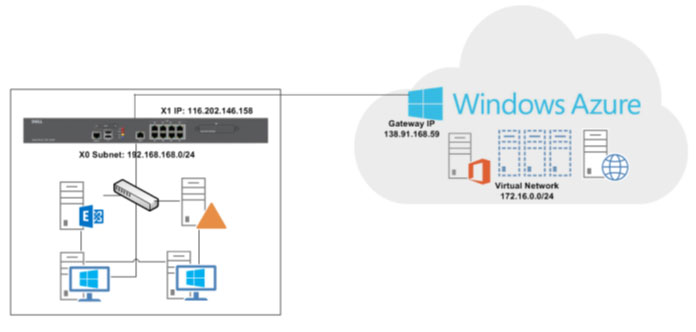
Microsoft provides Virtual Network as a service on Azure platform to connect our on-premises network through site-to-site VPN, means we can set up and connect to a remote branch office. We control the network topology, including configuration of DNS and IP address ranges, and manage it just like your on-premises infrastructure.
Configure a policy-based VPN between Windows Azure and a on premise Network (Dell SonicWALL Firewall)
Windows Azure provides site-to-site VPN connectivity between a Dell SonicWALL Next-Generation (NG) Firewall and virtual networks hosted in the Windows Azure cloud.
Azure VPN Setup Considerations:
We have to consider below points before setting up the site to site connectivity between Azure VPN and SonicWALL:
-
Microsoft Azure management portal provides two different types of Routing terminology (Static Routing and Dynamic Routing) on Virtual Network Dashboard. See the below comparison between Azure Routing terminology and SonicWALL interface:
| Windows Azure |
SonicWALL |
| Dynamic Routing |
Route-Based |
| Static Routing |
Policy-Based |
- Windows Azure supports Dynamic Routing (route-based) and Static Routing (policy-based) site-to-site VPNs.
- For authentication, only Pre-Shared Key (PSK) is currently supported. Certificate based site-to-site VPNs are not yet supported.
Supported Platforms
Windows Azure is supported with the following Dell SonicWALL series:
- SuperMassive E10000 Series
- SuperMassive 9000 Series
- E-Class NSA Series
- NSA 2600 / 3600 / 4600 / 5600 / 6600
- NSA 220 / 220W / 240 / 250M / 250MW / 2400 / 2400MX / 3500 / 4500 / 5000
- TZ 100 / 100W / 105 / 105W / 200 / 200W / 205 / 250W / 210 / 210W / 215 / 215W
We are using SonicWALL NSA 220 series in Saviant and have setup the site to site connectivity between Azure VPN and SonicWALL NSA 220 series successfully
Configuring a Policy-Based VPN
To configure a policy-based VPN between the Dell SonicWALL Firewall and Windows Azure, perform the below steps:
Windows Azure Configuration
Creating a Virtual Network
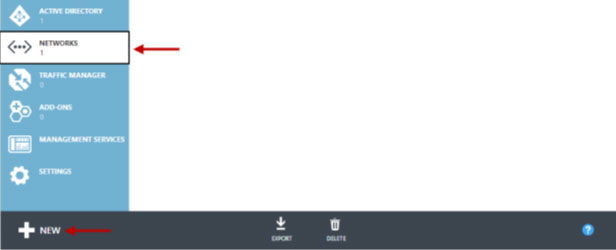
- 1. Log into the Windows Azure Management Portal.
- In the left-hand navigation menu, click ‘Networks’.
- In the bottom left-hand corner of the screen, click ‘New’.
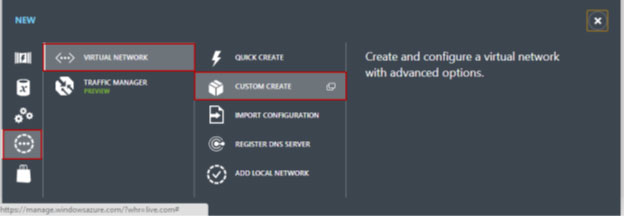
- Click Networks > Virtual Network > Custom Create.
- The “Create A Virtual Network” wizard displays following details:
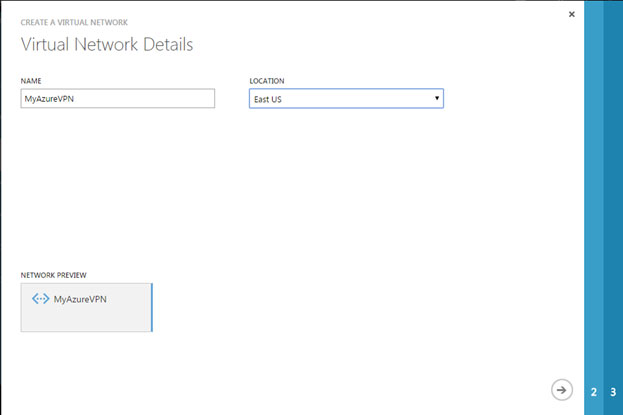
- On the Virtual Network Details page, enter the following information:
- Name – Name your virtual network.
- Location – Select a location.
- Click the Right Arrow button to continue to the next page.
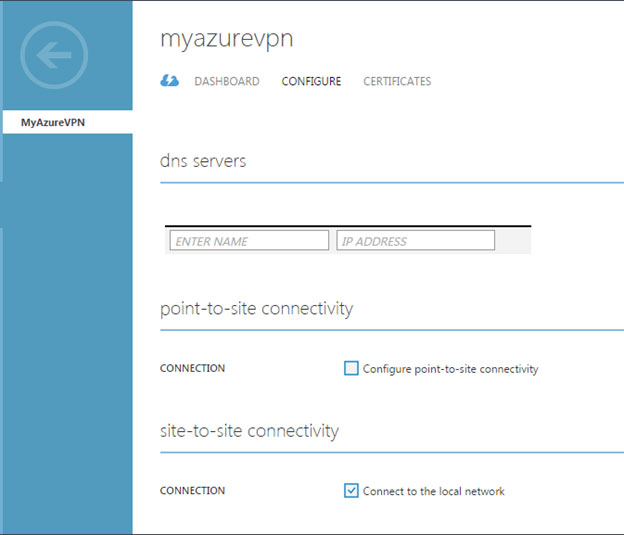
- The "DNS Servers and VPN Connectivity" page displays following details:
- Click the Configure site-to-site VPN checkbox.
- Click the LOCAL NETWORK drop-down menu and either select a network (if it has been created already) or select Specify a New Local Network. The Local network here would be the network behind the Dell SonicWALL Firewall.
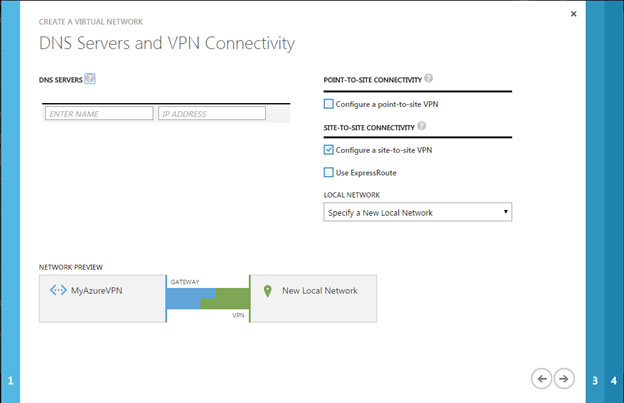
- Click on the Right Arrow button to proceed to the next page.
- "Site-to-Site Connectivity" page displays following details:
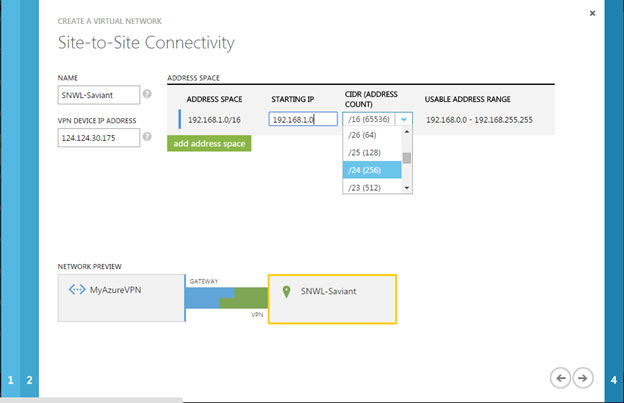
- Enter the following information:
- Name – The name you want to give to your local network site. This is the network behind the Dell SonicWALL Firewall.
- VPN Device IP Address – This is the WAN IPv4 address of the Dell SonicWALL Firewall. Note: The firewall cannot be located behind a NAT device.
- The Address Space (including Starting IP and CIDR) is the internal network behind the Dell SonicWALL Firewall. We can add additional networks behind the Dell SonicWALL Firewall by clicking the Add address space button.
- Click on the Right Arrow button to proceed to the next page.
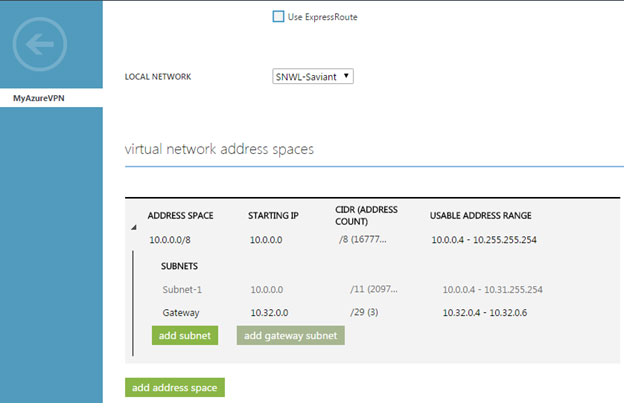
- Configure a Virtual Network Address
- The “Virtual Network Address Spaces” page displays following details:
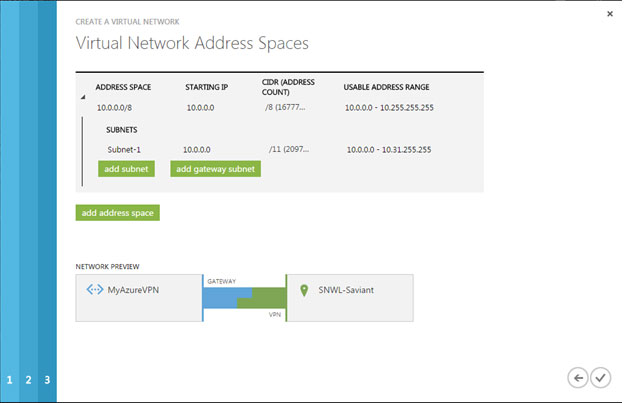
- Enter the virtual network name in the cloud.
Note: Address space must be a private address range, specified in CIDR notation. For Example, 10.0.0.0/8, 172.16.0.0/12, or 192.168.0.0/16 (as specified by RFC 1918). For more information about the settings on this page, see Virtual Network Address Spaces page in About Configuring a Virtual Network using the Management Portal.
- Click the STARTING IP drop-down menu, and then enter the network ID (private address range).
- Click the CIDR drop-down menu, and then select the desired subnet bit.
- The “add gateway subnet” will be automatically populated based on the address space entered above. Microsoft runs a gateway service to enable cross-premises connectivity. To this end, they require 2 IP addresses from the virtual network to enable routing between the physical premises and the cloud. At least a /29 subnet must be specified from which they can pick IP addresses for setting up routes.
- Click the Tick Mark button to create your network.
After your virtual network is created, the Management Portal > Networks page displays the Status as "Created":
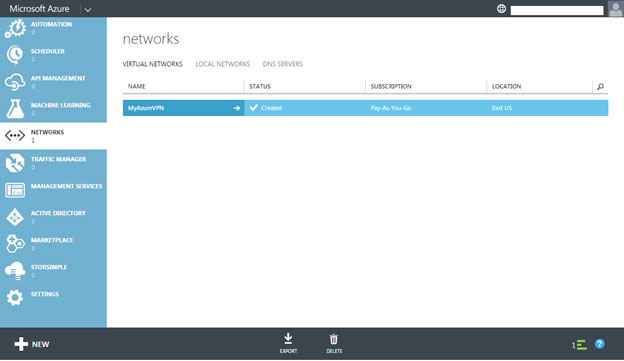
At this point in the configuration, a virtual network is created in the cloud and a remote network is specified (the Dell SonicWALL network).
To view the configuration details, click on the name of the virtual network (in this case MyAzureVPN) in the NAME column. A dashboard displays, click CONFIGURE to view the details:
- Create a Virtual Network Gateway
- Click DASHBOARD.
- Click the CREATE GATEWAY button, and then select Static Routing.
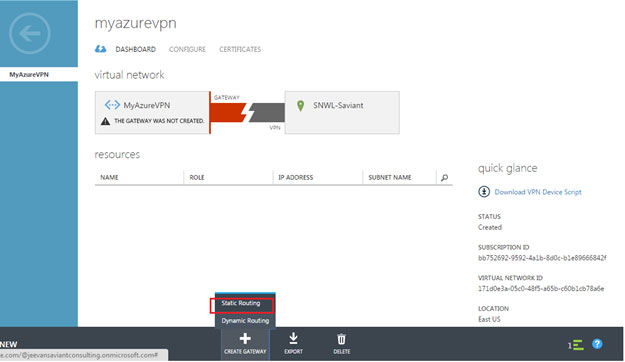
When prompted to confirm the gateway creation, click YES. Depending on your connection, it may take about 15 minutes for the gateway to be created.
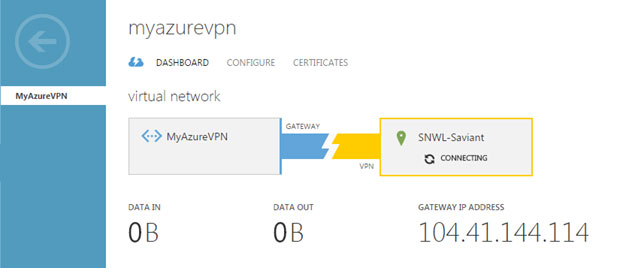
The public facing IPv4 address will not be generated until the gateway has been created. Once the gateway is created, we will be able to see the public facing IPv4 address of your virtual network under GATEWAY IP ADDRESS. This IP address must be entered under IPsec Primary Gateway Name or Address in the SonicWALL
Note: The gateway IP address may if the gateway is deleted and recreated.
SonicWALL Configuration Tasks
Login to the SonicWALL Management Interface as an administrator.
- Create an Address Object for the Virtual Network
- Navigate to the Network > Address Objects page.
- Click the Add… button to create a new Address Object.
- The “Add Address Object” window displays following details:
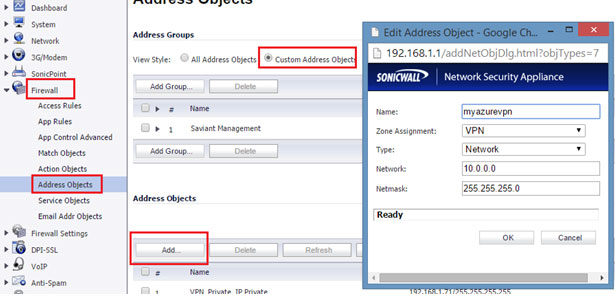
- Enter the address object information in the text-fields. This needs to be the same information that was previously entered/configured in the Windows Azure Management Portal.
- Click the OK button.
- Create a Policy-Based VPN
- Navigate to the VPN > Settings page.
- Click the Add… button.
- The “VPN Policy” pop-up window displays following details:
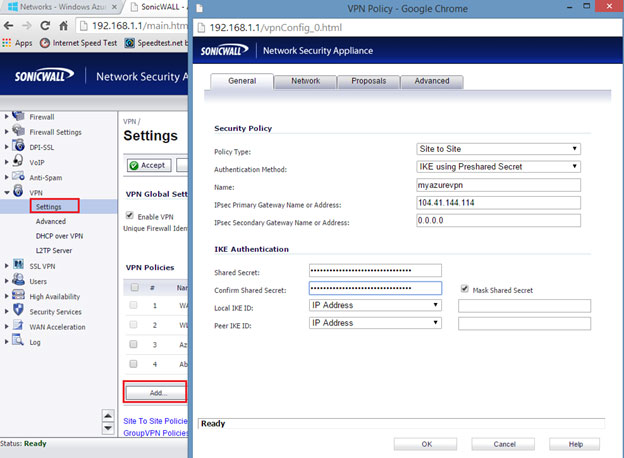
Enter the following information:
- Policy Type – Select Site to Site from the drop-down menu.
- Authentication Method – Select the desired method.
- Name – Enter a name for the policy (we are using Azure in this example).
- IPsec Primary Gateway Name or Address – Enter the GATEWAY IP ADDRESS displayed on the “Virtual Network” page of the Windows Azure Management Portal. (e.g. 104.41.144.114).
- Shared Secret – This is auto-generated by Windows Azure. Copy it from the Windows Azure Virtual Network dashboard, under Manage Key, and then enter it into this text-field.
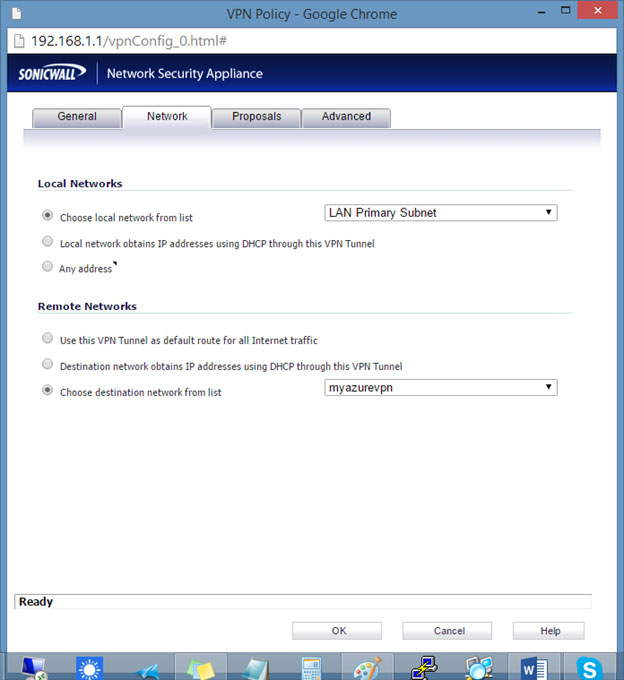
- Click the Network tab.
- Click the Choose local network from list radio button, and then select the desired local network.
(This may vary depending on your network, we are using the LAN Primary Subnet in this as an example).
- Note: This needs to be the same local network that was previously entered in the Azure Management Portal under the Starting IP text-field. Please refer to step 13 in the “Windows Azure Configuration Tasks” section to obtain this IP address.
- Click the Choose options as shown below:
- Click the Proposals tab.
- Click the Exchange drop-down menu, and then select Main Mode. Note: Windows Azure supports only Main Mode for static-routing site to site VPN.
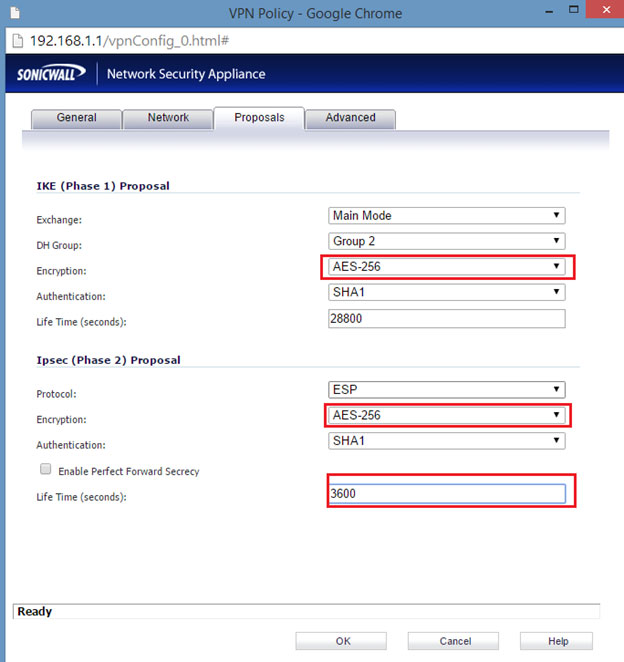
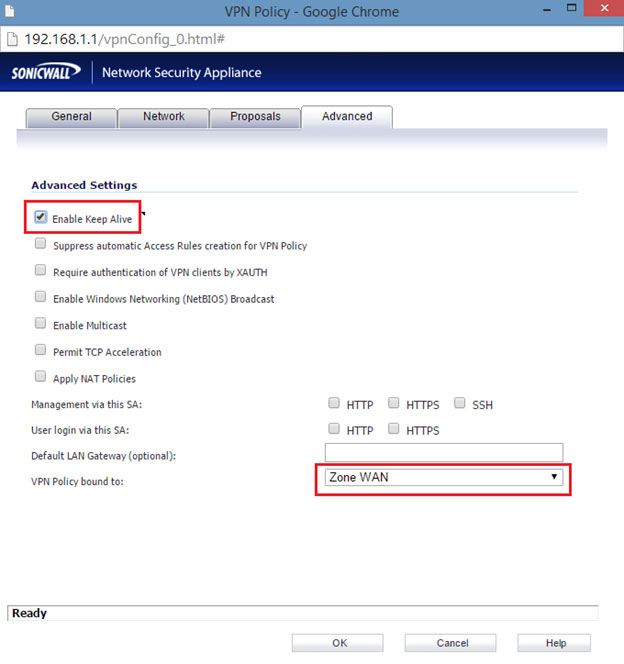
- Click the Advanced tab.
- Select Enable Keep Alive option.
- Click the ‘VPN Policy bound to’ drop-down menu, and then select the appropriate interface (the WAN interface on the SonicWALL Security Appliance). For example: Zone WAN.
- Click the OK button.
It shows green icon if connected successfully as seen in the figure below.

Test the Connectivity
Now that we have completed the configuration on both sides, it is time to initiate the VPN connection.
- In the Windows Azure Management Portal, navigate to Networks, and then click on your virtual network to go to its Dashboard page.
- At the bottom of this page, click on CONNECT.
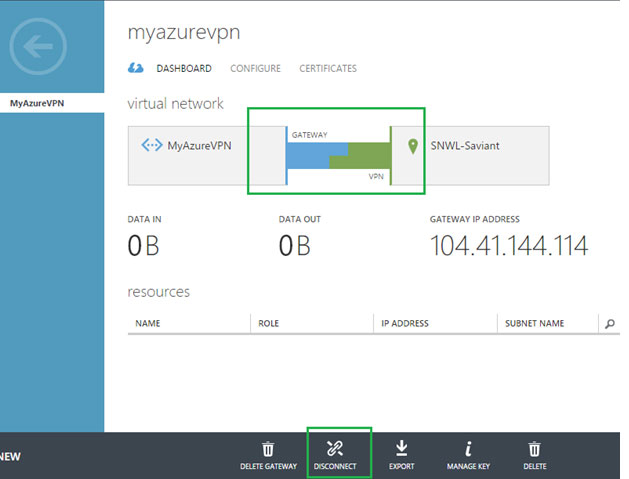
As seen in the figure above, the connection is now successfully established between Azure and Firewall.